Sugar Cookie Bouquet for Mother’s Day
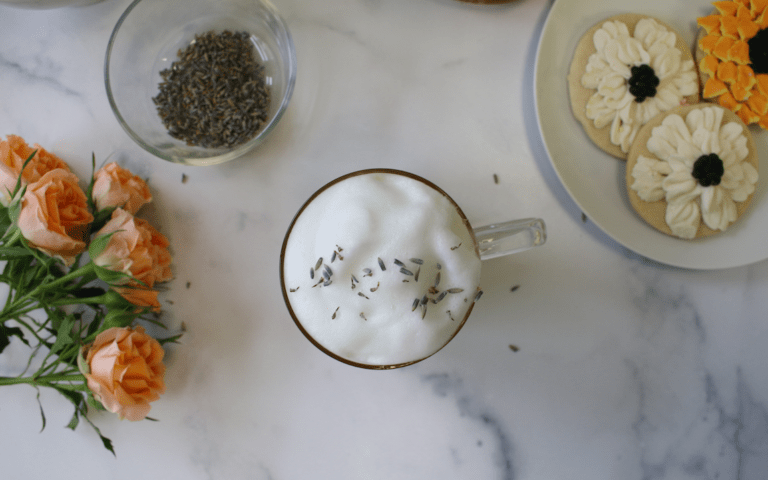
The best gift is edible (in my opinion), with flowers being tied. This post will show you how to combine the two into a cute mothers day dessert idea – the delicious sugar cookie bouquet! These sugar cookies are buttery with soft centers and crisp edges.

How To Get Started
To make a beautiful sugar cookie bouquet, I used three cookie cutters, 8 Petal Daisy, Mason Jar, Plaque (Tag). I hand cut the leaves because I didn’t have a cutter with the leaf shape I wanted but you can buy a leaf shaped cookie cutter like this one.
To really make this “bouquet” customized to give as a gift, here is a list of more ideas.
- Choose cookie cutters of flowers that they like
- Use multiple cookie cutters of different sizes for a variety of flowers
- Dye royal icing in multiple colors or keep it one color for a monochromatic aesthetic
Also, this bouquet can be used for any occasion – not just mothers day! What makes this unique for mothers days, is the tag with the word MOM on it. But feel free to write any message you’d like.

How to Display/Gift This Cookie Set
This sugar cookie bouquet is meant to lay flat in order to be an easy way to display cookies. If you’re having a party at home, these sugar cookies would look beautiful arranged on a plate or platter that is flat.
If you are going to travel, pack these cookies in airtight containers but do not stack them. The royal icing on cookies is delicate and can crack easily if they’re stacked under too much pressure, especially during car rides.
If you’d like to put gift these in a box, I’d recommend a large donut box. This box is can fit about 10-12 sugar cookies. To pack cookies in these boxes, first put down a piece of parchment or wax paper. Then, add crinkle paper to stop cookies from moving around.
Step #1: Bake Sugar Cookies
This sugar cookie recipe is very easy to make, you just need enough time for the chilling dough. Start by beating the butter at high speed, then add the sugar and beat until incorporated. Add the egg, vanilla extract, salt and mix. Then, add the flour in two parts and mix until the dough comes together.
Wrap the dough in plastic wrap and place in the refrigerator to chill for at least 30 minutes or overnight.

Dough that has been chilled overnight needs to slightly softened or it will be impossible to roll out. Let the dough thaw slightly at room temperature for about 20-30 minutes. Depending on how warm your kitchen is, it might still be hard but that’s okay. As you work with the dough, the warmth of your hands will soften it.
Roll out the dough to 1/4-inch thick. I’ve experimented many different thicknesses of dough and this is perfect for a soft center but crispy edge cookie. Preheat the oven to 350℉ (177℃). Prepare baking trays with parchment paper and place cut outs about 2 inches apart. 3-4 inch shapes should be baked for 9-10 minutes or until just golden brown on the edges and bottoms.
Use a spatula to transfer sugar cookies to a cooling rack. Don’t let them sit on the hot pan or they will keep baking. Allow the cookies to cool completely before decorating.
Step #2: Make Royal Icing

Make the royal icing by mixing sugar and egg whites in the bowl of a stand mixer with the whisk attachment. I use my two ingredient royal recipe which is also on the recipe card below. This recipe makes pipe-able icing consistency, which is great for decorating.
For piping the green center of the flowers (shown in the image above), you will need to make some stiff consistency icing.
- Scoop 1/3 cup of royal icing into a separate bowl. Add 1 tbsp of powdered sugar and mix.
- Dip a spoon/spatula into the icing and hold it over the bowl. If the icing slowly runs off the spatula, add another tbsp of powdered sugar. Keep adding powdered sugar until the icing doesn’t run off.
- Dye this icing with a small drop of moss green and add to a piping bag and set aside.
To dye royal icing, I like to use AmeriColor food gel dye because a little goes along way. Also, gel dye doesn’t add unnecessary liquid which can change royal icing consistency. This cookie set uses AmeriColor soft pink, sky blue, super black, lemon yellow, moss green, electric green, and orange. You’ll also need some piping bags and either make a knot in the piping bag or a clip so icing doesn’t leak out.
- Scoop 1/3 cup of white icing into a piping bag, tie the bag or use a chip clip to keep it from leaking and set aside.
- Add 1/4 cup of icing into a bowl and dye with 2-3 drops super black. Scoop into a piping bag and set aside.
- For the remaining colors, separate 1/3 cup of icing into bowls. Dye the icing following the drops amount below.
| ICING COLOR + CONSISTENCY | COLOR |
| White medium consistency | |
| Pink medium consistency | 1 drop soft pink |
| Yellow medium consistency | tiny drop lemon yellow |
| Blue medium consistency | tiny drop sky blue |
| Light green medium consistency | tiny drop electric green |
| Moss green stiff consistency | tiny drop moss |
| Black medium consistency | 2-3 drops super black |
To create the pretty orange color on the center of the flower, we will “paint” with royal icing. Use a food safe brush to mix and paint on cookies.
WATCH THE SUGAR COOKIE BOUQUET VIDEO
Step #3 Decorating the Sugar Cookie Bouquet
Cut small holes across the tip of the piping bags. Always cut smaller holes first as you can always cut the hole larger if needed.
Rustic Mason Jar Vase


- First, use blue icing to pipe an outline and then fill in.
- Before the icing dries, pipe “stems” with the light green icing. This is called the wet on wet technique. The stems will look like they are in the vase inside of laying on top. Let this cookie dry for about 5 minutes.
- Use the blue icing to outline the mason jar as shown above and let it dry.
- Once the icing has dried, use white icing to pipe a bow on the lid.
Gift Tag


- Outline the cookie with white icing, flood it and let it dry.
- I cut the tip of the black icing bag slightly larger to make the words thick, but you can cut this smaller for more delicate lettering. Pipe the word mom or whatever message you’d like and set aside to dry.
Leaves

- Pipe light green onto half of the leaf and let dry for about 5 minutes.
- Once the first side has dried, pipe the other half of the leaf. By letting the first side dry, it creates a 3D effect.
- Optional I piped a little bulky bee using the colors I had already made for the other cookies.
Cheerful Flowers

- Use yellow icing to outline the cookie.Then, fill in the cookie and let it dry.
- After it’s dry, use the same icing to outline the petals. (I let the center be messy because it’ll be covered up).

- Repeat with pink icing.
- Let the flowers dry completing. “Painting” requires pressure and it’s very easy to crack through a cookie with a brush.


- Mix a drop of orange and half a drop of yellow food gel onto a paper plate. Then, with a very light hand, use an edible food brush to lightly dab color onto the center of the cookie.
- Keep tapping with the brush gently so the color is lighter the further out it goes.

- With light green icing, pipe a big center onto the flower.
- Using the white icing, pipe two small lines onto each petal.

- With the moss green icing, cut the piping bag tip very small. Then, start on the outside of the center and pipe small dots, lifting the bag straight up each time to create little peaks.
- Once the entire center is filled, let the flowers dry.
Arranging the Bouquet


How you would like to arrange the bouquet is completely up to you! Once the royal icing has dried, carefully lay the cookies on top of each other because they can crack easily.

I think this looks so pretty on a plate for a mother’s day party – or what ever occasion you’re having!
How Long To Store Sugar Cookies?
Sugar cookies can be stored in an air tight container at room temperature for up to 1 week. You can store undecorated and decorated cookies in the freezer in an airtight container for up to 2 months.

RECIPE CARD
Mother’s Day Sugar Cookie Bouquet
Equipment
Ingredients
- 2 sticks unsalted butter (room temperature) (226g)
- 1 cup + 2 tbsp granulated sugar (228g)
- 1 egg (room temperature)
- 1 1/2 tsp vanilla extract
- 1 pinch salt
- 3 cups all-purpose flour (360g)
Royal Icing
- 3 egg whites or about 3.4 fl oz pasteurized liquid egg whites
- 4 cups powdered sugar (450g)
Instructions
- In the bowl of a stand mixer, equip the paddle attachment. If using a hand held mixer, equip beaters. Mix the butter on high speed for 30 seconds until creamy.
- Add the sugar and beat for 2 minutes on high speed. Scrape down the sides of the bowl with a spatula.
- Add the egg, vanilla extract, and pinch of salt and mix on medium speed until just combined.
- Add in half of the flour and mix until incorporated, then add the other half. Stop mixing when the flour has incorporated and the dough comes together.
- Spread out a piece of plastic wrap onto the counter. Turn out the dough onto the plastic wrap. If the dough is slightly crumbly, gently knead it together. Place in the refrigerator for 30 minutes or overnight.
- Once chilled, preheat the oven to 350℉ (177℃). Prepare your baking trays with parchment paper. (If chilling dough overnight, take it out of the refrigerator about 30 minutes before rolling into shapes).
- Divide the dough into two parts. Lightly flour a clean flat surface and place the dough on top. Gently press the dough flat with your palm. Use a rolling pin to roll out the dough, turning it as you roll for even thickness. If it's sticky, sprinkle flour on top of the dough. Roll the dough out to 1/4-inch thick.
- Cut out your shapes and place on a baking tray, 2 inches apart. 3-4 inch shapes should be baked for 9-10 minutes or until the bottoms are just golden brown.
- Take out the cookies and move to a cooling rack. Don't let them sit on the hot pan or they will keep baking. Allow the cookies to cool completely before decorating.
Royal Icing
- Attach the whisk attachment to your stand mixer. If using liquid egg whites, measure out 3.4 fl oz. If using fresh eggs, separate your egg whites from the yolks.
- In the bowl of a stand mixer, add your egg whites and beat them at low speed until frothy, about 30 seconds. Add powdered sugar one cup at a time and mix on low speed in-between additions. After all the sugar is added, set the speed to medium-high and beat until stiff peaks form (5-8 minutes).
- Decorate cookies with royal icing. Follow the instructions on the blog post for how to decorate each cookie. Let the royal icing air dry for 12 hours or overnight before arranging into a bouquet.
- Plain cookies or decorated cookies can last in an airtight container for 1 week. Or in the freezer for up to 2 months.
Notes
- Freezing: You can freeze plain or decorated cookies for 2 months. Let the cookies thaw before serving. Cookie dough can be frozen up to 2 months. Remove frozen dough for the freezer and let it thaw out about 20-30 minutes before rolling then begin at step 6 above.
- Baking: Different size cookies need different baking times. Shapes smaller than 3 inches should bake for 7-8 minutes. Shapes larger than 4 inches should bake for 10-11 minutes.
- Decorate: Ice cookies with royal icing. See my easy royal icing recipe with egg whites to answer all your royal icing questions.This royal icing recipe was made to pair with these sugar cookies. The cookies are buttery and not overly sweet, so the icing gives it a nice sweetness.
- Tools: The things that help me bake the perfect cookies: 2 Nordic Baking Pans 13 x 18 inches (2 pans speeds up the baking process) | Stand mixer or Hand held mixer | AmeriColor soft gel paste food coloring | Piping bags | Rubber spatula | Digital scale | Rolling pin


2 Comments